Monday, January 12, 2009

Create a Web Database

FormLogix is a site designed to help users gather data over the web. FormLogix provides a complete solution for managing data over the web.

You may create your own application form in order to input records to your web database table.

For example, I've create a "Movie Database" application form (It took me only a few minutes!!!) through its WYSIWYG wonderful designer. It looks like this...


Through this application form I can input movie records. Other way, is to import from an excel file.


What you see up here is a query obtained through the strong data analysis tool.

Add a new movie through the application form up here, and see how this list is automatically updated with no intervention at all. This Web Database tool is really great!!!

The Data analysis window look like this...
Click to enlarge

The FormLogix platform is easy to utilize and users do not require any technical or programming skills. Users are able to create web forms and publish them on their own web site or make it secure.

FormLogix is unique AJAX-based tool for creating any type of data driven form.

Thank you for reading "Create a Web Database".

Web Database Builder

Event Registration Form

Registration Forms are being used more and more...
If you want to invite people to an event you organize, you don't need to phone them or mail them, you just publish an event registration form in your site.

You don't need any programming skills to create the event registration form and publish it into your own site...like the following ones...


All of these Event Registration Forms are templates you may use them, modify them and publish them in no time at all. Registrate to formlogix, and start using the WYSIWYG formlogix designer.

How can I use these templates to publish my own event registration form?

Registrate to formlogix
Go to the Data Center window and click on the link "Create a Form Based on a Template"
Click to enlarge

You will be redirected to the search template window, press "View" to see in the right window the form selected, and press load in order to load it in the designer.

Click to enlarge

In the designer, first you will need to change the form name (By default is "new form"), then modify the event registration form as needed, and then save it!. after saving it , the event registration form is completely yours and will be shown in the "Data Center" window together with all of your web forms. Finally, press the publish button and copy the code line (IFRAME or SCRIPT method) into your web site!

Click to enlarge

That's all folks! you own an event registration form createded with the top of the line ASP.NET and AJAX technologies, with no even program a single line of code!

Thank you for reading: "Event Registration Form"

Web Form Builder

Thursday, January 8, 2009

Create a Survey Form

After reading this post you will be able to create and publish all kind of Survey Forms...

Here, you may see a Survey Form I've created...


Name of the Survey Form: "Survey Form BlogSpot"

The name will allow you to copy (clone) this Survey Form and make it yours, then, you may modify it to your own needs.

There are 3 simple steps to have a Survey Form working on your web site!


  1. Registrate to FormLogix

  2. Copy (Clone) the Web Form

  3. Publish it in your web site


Create and Publish a simple Survey Form it's easy. For those who want to implement all of the power that formlogix provides...keep reading...


Take advantage of the formlogix advanced tools:


As you can see, the Survey Form up here, provides the users the posibility to see the results of the survey. There are two different links that show the results, one is a table list showing the records of the fillers with their answers, and the other is a graph displaying the choice selected by the users (bars graph). How can it be done? The tabular list and the graph are internal data and belong to the owner of the Survey Form, the owner can see this kind of information in his formlogix account. The owner of the Survey Form can turn this information (or part of it) public, and add it to a link (as shown up here).


Click to enlarge
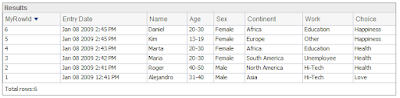
Survey Form tabular list
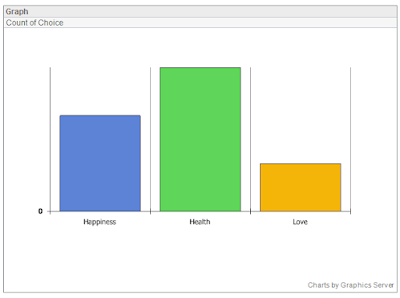

Click to enlarge
Survey Form Graph


How to make the list public?

1. Go to the Data Center window...you will see all your web forms here. If you don't have a survey form yet, create one or copy (clone) a shared one as shown in step 2 (Create Form Based on a Shared Form).

Click to enlarge

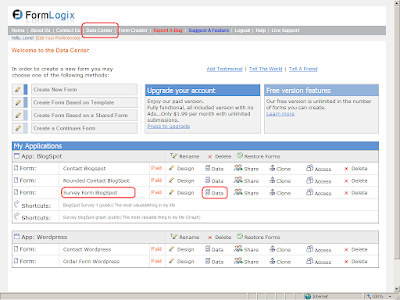
2. Click the "Data" link of the desired form to open the "Form Entries Window".

3. Here, you will choose all the fields you want to make them public, press go and see the results in the tabular list.
Click to enlarge

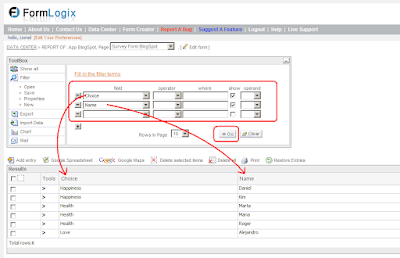
4. Now press save in order to save the query, and provide a name and description, and check the "Create link to public report" checkbox .


5. Then, you will press "properties" and see the "Show Link" link, click it and copy the link from the url address! That's it! you did a public report and you can copy the url to the link element in the Survey Form as I did in my Survey Form up here.


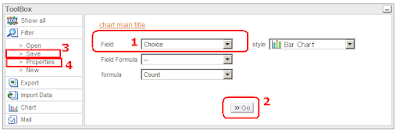
How to make the graph public?


First do the steps 1 and 2 of the "howtomakethe list public".

Then, choose the field you want to summarize in the bar graph, press go, and then as explained before, choose save to make it public, choose properties and save the url link of the graph. see image.


The End!

Thanks for reading the post: "Create a Survey Form"

Saturday, January 3, 2009

Create and Place a Contact Form in your site

If you were thinking of placing a nice contact form in your own site, you'll like this post, if you though of making it in no time, you will love it!
Here, three simple steps to got the job done:
1. Registrate to FormLogix, 2. Choose the Web Contact Form you most like it, 3. Publish it in your own site!
The 1 and 3 steps I've already explained in detail in my previous post: How to create an order form. So I will explain here, the step 2, how to choose it...sounds simple? well... it is!

Name: "Contact BlogSpot"


Name: "Rounded Contact BlogSpot"


Login to FormLogix, go tothe data center where you will be able to see all your web forms. In order to copy one of these contact forms just , click on the "Create Form Based on a Shared Form" and search the choosed contact form by its name. The Contact Form will be opened in the designer, change the name (By default will be "new form") and save it! That's it, the form is yours.

after placing the contact formin your site, you will start receiving email alerts for every contact filling your form.

Thank you for reading the post "Create and Place a Contact Form in your site".