 |
| Get your money out of paypal through payoneer |
Excellent news from FormLogix!
Beside the fact that FormLogix allow us to easily create web forms in an online environment and publish them into our sites, since december the 12, 2008
FormLogix integrates four different methods to get money from an
order form generated here.
The 4 methods are:
Paypal - Google Checkout- SWREG - Moneybookers
In this post I'll explain how to create an order form in FormLogix incorporating PayPal as the payment method (my personal favorite), and publish this order form in your web, then you will be able to start selling your goods or services from the order form created.
How much time it will take to insert an order form in my web site?
About 10 minutes:
- Paypal Registration (4 minutes)
- FormLogix Registration (less than a minute)
- Cloning an existent order form (1 minute)
- Modify the order form to your own needs (2 minutes)
- Adding the payment method (1 minute)
- Publish your order form (1 minute)
I'll explain these steps in detail!
1-
PayPal Registration (Back to Top)
Press here to start registration at PayPal.
After pressing the link, the next page will show up... go to the end of the page and press the button "Sign Up Today!". see snapshot.

After clicking on the button "Sign Up Today", you will be redirected to the choosing account page. see snapshot.

Here you will need to find your country in the combobox and choose between the "Premier Account" and "Business Account". The "Personal Account" it will be good only for buying but not for selling products.
The "Premier Account" is for individuals who want to buy and/or sell , and the "Business Account" is intended for business use, Companies or Shops who want to sell over the internet. Press the button "Get Started" to input your info for the elected account.

Fill up all the required fields and press the button "Agree and Create Account".
Congratulations! You already have a PayPal Account.
Notes:
In your free time, fill up the info of your visa international credit card. The money of your sales will be added to your paypal account and you'll be able to extract money in a daily base. After requesting the money will take about 4-5 days to be transferred to your bank account (The bank account of the provided credit card). U.S. residents may transfer money from the paypal account straight to their bank accounts (credit card not needed) taking about two days the operation.
Open an account and send money it's free, but PayPal collect money each time you extract money from your account.
you may see the fees here. Paypal will collect 4 euros (o 5 us dollars) every time you extract money.
Well, we may continue with next step...
2-
FormLogix Registration (Back to top)
This step is very easy to accomplish,
press here and type your name, company, mail and choose a password for your account... see snapshot.

Input your personal data and press the button "Register". That's it! You belong to the FormLogix Comunity!
3-
Cloning an existent Order Form (Back to top)
I could explain how to create an order form from scratch, but I decide to explain how to clone an existent order form, due to the fact that I'm sure you don't have time for long explanations... I leave the create from scratch for the upcoming post.
Ok.
Get into your account, you will be automatically redirected to the
Data Center Page.
Now press the link "Create Form Based on a Shared Form". see snapshot.

Here, you will be able to search among all the web forms that other users decided to share with the entire comunity.
I've specially prepared an order form to be cloned by you. Search the order form by the name of "Order Form SP Book - Paypal".

In order to see the order form in the lef side window click in the name form link (View Form), when you're sure this is the order form you wanted, press the stamp icon in order to clone it.
By clicking on the stamp icon, the selected order form will be open in the formlogix window designer...

What you need to do right now is to change the order form name, since by default is given the name of "new form". Provide an adecuate name, then save it!. Now the order form is only yours. It will appear in your form list (Data Center), and you may decide to share it with the comunity or not. We have finished the more tedious part. From now on, I promess it will be just fun!.
4-
Modify the order form to your own needs (Back to top)
We already have cloned the order form, now we need to modify it, unless you want start selling my mother's poetry book. :-)
My mother's order form...
Let's continue... After saving the order form we are still inside the designer. We are going to modify this order form to our own needs.
Basically, we need to delete or change the images in the order form and delete or change the labels on it.
Let's say we want to sell some of the 1800's 3 dollar bills my grand-grandpa has hidden under the mattress.

We'll change the book image by the three dollar bill image. Leave the paypal image as it (It is good for us). The image settings window will show up at the right side after clicking on the image, find the property "path", click "browse", and search the image in you pc (the image is taken from your pc. I found the 3 dollar bill by googling). see previous snapshot.
Now we need to modify labels, their position in the order form and delete those we dont need. This is super-intuitive because the high level of the WYSIWYG formlogix designer, but if you have any doubt or question, leave me a message in the blog comment form or in my personal contact form designed also with this tool (right sidebar).

I've also changed the price label text, since we want to charge 50 dollars for each three dollar bill.
Don't forget to save the order form.
So far, we have created a very nice web form, but, in order to convert this web form in a fully functional order form that by clicking on the "Buy" button redirect the buyer to the paypal buying page...we need to add the information regarding the
payment method...
5-
Adding the Paymant Method (Back to top)
Getting to the end... We now must add the payment method (Called also "Payment Integration") to the order form. In order to integrate the payment method, click in the last parameter of the form settings, called "Payment Integration".
Choose PayPal and press "Continue". see snapshot.

Enter your seller email, product name, price and currency in the second tab (Payment Configuration).
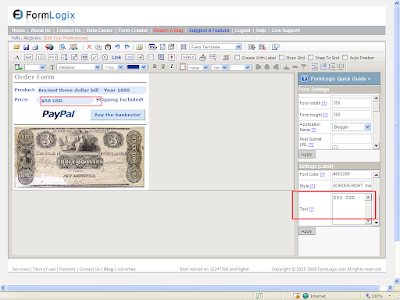
After clicking on "Finish" we will see:
Payment method successfully saved!
You can now test the method with this Link
By pressing the link, you will be able to check the paypal payment page, the same page that will be displayed to your clients after pressing the "Buy" button of your order form.
We may say now, that we've finished the order form with all the needful data!.
You now must insert the order form in your site...
6-
Publish your order form (Back to top)
We're almost done here. This is very easy... There are five different publish methods. You need to press the "publish" icon, then choose "SCRIPT" or "IFRAME". Copy the displayed code in your web site!. see snapshot.

END!
Thanks for reading the post "How To Create an Order Form".


